To edit a custom field definition
|
1
|
Click Account > Account Details. The Account Setup and Maintenance page opens, displaying the Account Details tab.
|
|
2
|
Click the Custom Field Definitions tab.
|
Custom field information displays for existing custom fields.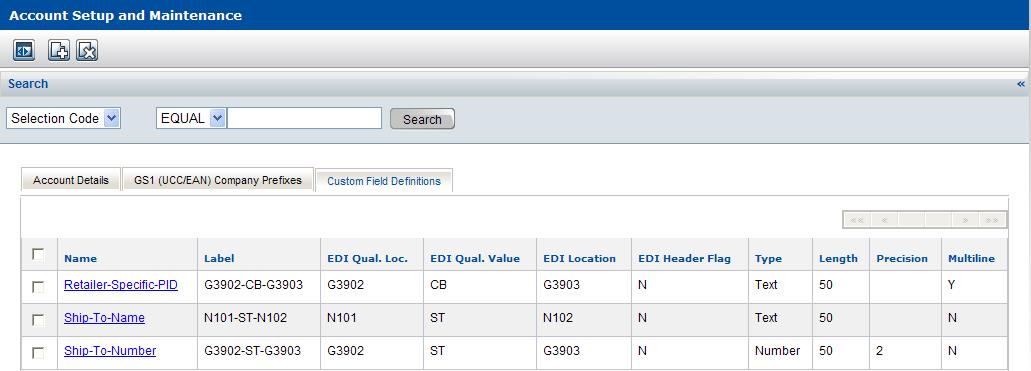
The Custom Field Definitions pop-up opens.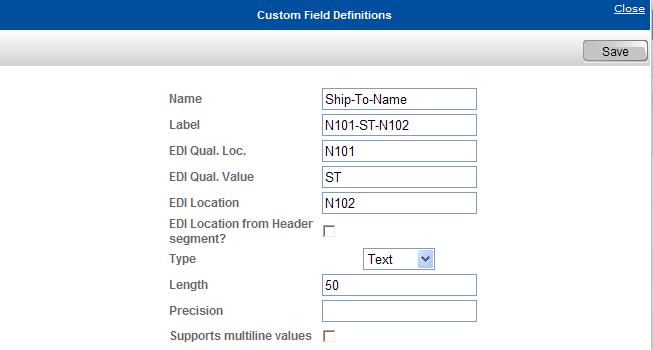
|
|
Name—Required. Type the name of the custom field.
|
|
|
Label—Optional, but if you leave it blank, the system creates a label that is identical to the name. Type a description for the custom field that identifies the field and has meaning to you. The description does not need to be unique.
|
|
|
EDI Qual. Loc.—Optional, but must be present if EDI Qual. Value is present.
|
Type the EDI location for the qualifier. The location consists of the EDI segment and position. For example, type N101. N1 refers to the segment and 01 refers to the field position.
|
|
EDI Qual. Value—Optional, but must be present if EDI Qual. Loc. is present.
|
Type a value for the EDI qualifier. For example, type ST.
|
|
EDI Location—Required if an EDI 888 document is used to populate custom field values (optional, if the UI used to populate values).
|
|
|
EDI Location from Header segment?—Optional. Select the check box to indicate that you want EDI Location (segment and position) to be determined by the Header level (not the Detail level).
|
|
|
Type—Required. From the drop-down list, select the data type for the value associated with this Product for a specific vendor/retailer relationship. The value resides in the location specified by EDI Location (for example, N102):
|
|
|
Text—Indicates that value is alphanumeric
|
|
|
Number—Indicates that the value is numeric
|
|
|
Length—Required. Type the maximum length for the value you want to associate with the Product.
|
|
|
Precision—If you selected Number in the Type field, enter the maximum number of digits that are allowed to the right of the decimal point for the value you want to associate with the Product. If the number is not a decimal, leave this field blank.
|
|
|
Supports multiline values—Optional. Select the check box to create a custom field definition that allows you to define multiple lines of custom field values for a single custom field definition.
|
See “Using an EDI 888 Document to Populate Custom Field Values” for a more detailed explanation of how some of these fields are used.
|
5
|
Click Save.
|
The custom field definition is saved and displays in the table on the Custom Field Definitions tab.